Pages

Monday, February 28, 2011

Cute, Easy Apron

I got this cute idea from Brandi Jo.
I went to DollarTree and bought 2 placemats and some ribbon.
I started out with taking the tags off the placemat.


 I found this awesome ribbon that I thought would look perfect with the pink and white polka dotted placemat.
I hot glued the ribbon on to the top of the placemat.  I then cut out a square from the other placemat and glued it on as a pocket.

I then took the flower and hot glued the flower I had from a previous project onto the pocket to give it a little pizzazz.

Here's a close-up of the flower I had from my previous project.

I'm giving it to my sister as a just because gift.  I think she will love it and be able to wear it around the house when she's baking and such.

Saturday, February 19, 2011

Cake Stand

As I was cruising the net at work I came across a blog that showed how to make your own cake stand.  I have always wanted a cake stand but I've been too cheap or haven't found "the one".  It showed all you had to do was find a plate and a candlestick holder.  So I decided to go on a hunt.  I checked Dollar Tree first because you can find a lot of treasures there depending on what you I looking for.  I actually found my first dishes for college there.  I found the perfect plate that would look nice in any setting.  I was also able to find glass candlestick holders.  I decided I didn't need to add anything to them.  This was the cheapest and easier DIY project I had ever done.  I didn't tak pictures of the plate and candlestick before I started but I think you get the point. 

I measured out the the exact center of the plate and put a small sharpie dot. 


Then I put gorilla glue(that I borrowed from Dad) along the top of the candlestick holder and centered it on the bottom of the plate.


I then used a ceramic bowl to put pressure on the candlestick.

And ta da!!!!!

I love my finished product.  I'm so excited to use it!

Friday, February 18, 2011

Kitchen Utensil Holders


I got this idea from Amanda over at Crafts by Amanda. I loved the look of it and have never found a good way to store my utensils until now!  Brandi Jo and I decided to put our heads together and come up with our own spin on them.
Brandi Jo and I went to Dollar Tree in search of some containers and when we found these we knew they would be perfect.  So I went ahead and bought 3 of them.


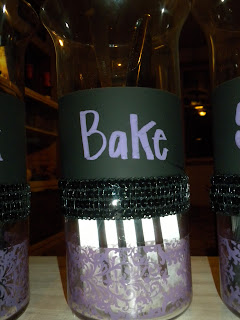
We decided we wanted to use chalkboard paint and chalk to write Cook, Serve, and Bake.

We started by measuring 3 inches down from the top and made a dot with a black sharpie.  Then measured another 2 inches down and made another dot with a black sharpie.  We did this 3 times on each glass container.

After we had everything measured we used painters tape and ran the tape along the measured out dots.

Since we had the dots it ensured that everything was in line.

After we got the painters tape on the center portion we covered the rest of the containers with newpaper to make sure that the chalkboard tape only ended up where we wanted it.


We took the containers outside and sprayed one coat of chalkboard paint on them and waited for them to dry.

Once they were dry we added some purple damask packing tape onto the bottom of the containers.
After placing the tape on, Brandi Jo wrote the words onto the chalkboard paint in nice lettering.

We decided it needed a little bit more.  So we added some sequins that Brandi Jo had underneath the chalkboard paint.


I love the way they turned out.
This will spruce up my kitchen and actually be very functional.


This was such a fun project and I am so glad Brandi Jo and I were able to work on it together!
Thank you Amanda for giving me the inspiration.

Side Table Restoration


I found this sweet little table while fabric shopping at St. Vinny's with Brand Jo.
I was imaging the possibilites and so I just had to have it.  I didn't exactly have a place for it when I bought it.
I loved what Brandi Jo did with a few of the pieces of furniture she had.
I noticed it had a white tag and was ecstatic because it meant it was 50% off.
I was able to score this for $7.50!

So I took it home and sanded it down.

Once I got it all sanded down Brandi Jo and I painted it with some paint my parents had laying around.
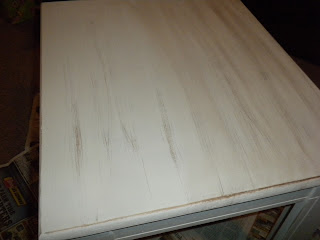
After the paint dried Brandi Jo and I roughed the paint up so the glaze would make the table look like it was antique.
As you can see we only ran the sandpaper over the top a few times, it didn't need to look uniform or anything.  The less uniform the more rutic which was the look we were going for.
After we got done roughing the paint up we wiped the table down with a cloth to make sure there was no left over dust.  As you can see Brandi Jo was very intensely making sure the dust was gone.
After the table was dusted off, we started putting the glaze on.  We chose brown rather than black. We had a damp cloth and a dry cloth on hand for wiping the glaze off after it had been applied.
We would get a little sidetracked and forget where the glaze had been applied and used the wet cloth to wipe it off.

This was my first furniture restoration and so Brandi Jo did everything showing me every step.
After the glazing was done we ended up with our finished product.


I think after everything was said and done we probably we able to restore this table for under $10 including the actual purchase of the table.

Looking at these pictures get me antsy to go to second hand stores and look for more furniture.  I had so much fun and am truly looking forward to more of Brandi Jo's guidance.

Oh and this table is not completely done because I want to add some pictures from my family background from when my family owned a dairy.  I cannot wait for the true end result.

Even so the table is so stinkin cute I will definitely find a place for it now :)

Burlap Wreaths

This is what we did on our craft day 2/13/11.

We all met at Brandi Jo's for a girl's (Laura, Londi, Meagan, Brandi Jo of course, and me.....Cassidy) craft day.  Everyone's wreath had personal variations.  I made mine for a wedding gift for a wedding I'm going to in September.  I will definitely be making more of these.  They are labor intensive but not difficult.

 Here is the step by step.

Step 1--We laid the burlap out on a flat surface.  We used the floor.

Step 2--We used a ruler to measure our strips.  We measured 4 inches to get it thick like the picture about but you can do as thin or thick as you like.

Step 3--Once we had cuts in the burlap 4 inches apart.  Brandi Jo showed use a trick to make our strips straight.  You find a string from either side of the slit and pull it gently.  Sometimes it breaks off but you can grab it again once you get down to where the string broke.

Step 4--When all the strings were pulled, we cut the strips.

Step 5--After the strips were cut, we took wire hangers and un-did them and made them into a semi circle.

Step 6--Once the hangers were in a semi circle we fed the burlap strips on back and forth in the middle, so it looked like an inchworm moving.

Step 7--Once all the  strips had been fed on, we made the hanger into a circle and wire wrapped the ends around each other.

Step 8--After the wire wrapping was done, we started on our details pieces.  For mine I had bought a wooden letter R and wanted to add some blue and purple flowers to mine.

Ad you can see from the picture I didn't want them all to be the same, I wanted the blue and purple flower to be in the center.
To make the flowers, I cut circles out of fabric freehand.  Then glued the different pices together. In the center of the flowers I hot glued pearl-looking buttons.  To make them have a multi-dimensional look we added some hot glue and squeezed them together.

To make it look full you just have to mess with it a little bit and move the burlap along the wire.

We had a blast making them and are going to try to do a craft together each month.

Friday, February 11, 2011

I know I know!

I know I haven't updated this since I started it but I fully plan to get it going soon.  I'm super excited for this weekend because a bunch of us girls are getting together at BJ's for a craft day!  I will definitely be able to put up some pictures from this weekend.
I am also working on finishing my scrapbook from Europe in 2006.  I've got to get it done by the end of the summer because I'm going to Pittsburgh to see one of the my besties get married and I actually met her on that trip.  So this weekend I will be making her a burlap wreath under Brandi Jo's direction.  If you haven't checked out her blog you have to!  She is so inspiring!